

Introduction to Ableton Live Interface
In this section, we will go through six topics,
- What is DAW
- Ableton Live Vs Other DAWs
- Ableton Session View
- Ableton Arrangement View
- How to Use Live Browser
- Preferences
These topics are the backbone of Ableton live recording. However, these are the basic things and if you are familiar with DAW recording you would understand these terms easily.
What is A DAW
A DAW or digital audio workstation is a type of software program which can be used to record, edit, mix and export digital audio within your computer.
There are several DAW software available in the market but the most commons are Ableton Live, Logic pro x, Cubase, Pro Tools, Logic, GarageBand, Audacity, and Reaper etc.
When you dig deep in the details you will find that each DAW is known for its own unique layout and features, but the main work of a DAW is recording, editing and processing digital audio.
I’ve used several times here the term “digital audio” because there is another type of recording exists – Analog recording, which produce analog audio signals and obviously different from digital audio.
There is a vast debate under digital and analog audio so I want to skip this topic for today. We just discuss here the features of a DAW. Here are the core features of a DAW
- It is capable of recording multi-track simultaneously. You just need a multichannel input audio interface to record multitrack simultaneously.
- DAWs incorporate MIDI functionality which allows you to program the notes by playing via Midi Controller You can use those notes to produce great music with Virtual Instruments.
- The third and most viable benefit of DAW is plugin support. You can use plugins to shape your mix like pros. Plugins can do everything from a simple compression and EQ to hardware emulations.
These features make a DAW is the best option for home studios. Those who can’t afford costly hardware can produce industry standard audio with just a right DAW.
I’ve used the term “right DAW” because choosing the wrong DAW could ruin your recording. Don’t go for free available options, always choose a professional one.
Ableton Live Vs Other DAWs
I know you are wondering if there are several professional DAWs in the market then why Ableton? Well here are a number the advantages of using Ableton over other DAWs.
- State-of-the-art Midi Programming interface – Which makes it a full-featured Midi sequencing giant.
- Ability to play with Midi and Audio clips simultaneously with the help of Live Bowser and the Arrangement View.
- Faster editing – When you will be familiar with this DAW you will notice that it’s much faster the other DAWs in terms of editing.
- Wide Library of Loops and samples
- And the last but not least – The Price. It’s fairly cheaper than other Midi sequencing DAWs like Cubase and Logic Pro X.
I think you are now better convinced about Ableton Live. Now its time to jump into Ableton live interface introduction.
Introduction to Ableton Live Interface
there are seven main parts of the Ableton Live interface
- Ableton Session View
- Ableton Arrangement View
- Browser
- Groove Pool
- Info
- Midi Instrument/Sample/Effect Window
In this section, we will take a closer look at these views and know how they are useful in creating music in Ableton.
Ableton Session View
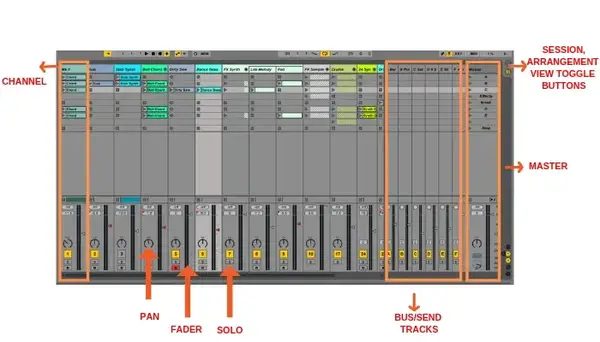
Note: If the session view is not opened in-default you can open it by going to View>Session View or click on the Session/Arrangement Window toggle button on the upper right corner as shown in the above image. Session View has many functions which are common in all DAWs.
- Channels
- Pan
- Fader
- Solo/Mute
- Bus, Send/Return
- Master Fader
Channel: In DAWs individual tracks are called channels where you can add effects select input/output, solo/mute and toggle record enable individually.
Pan: Pan is a feature of the channel which is used to panning the selected track’s sound left and right.
Faders: faders are used to balance the volume for individual channels. Each channel has its own separate fader. There are other faders also like Master fader, Bus and send faders.
Solo/Mute: Solo and mute buttons are used to listen to channels in solo mode and mute individual tracks respectively.
Bus, Send/Return: these channels are used to add effects like reverb and delay and routing/grouping the instrument and audio tracks.
Master Fader: Master fader is used to balance the master output sound and adding effects to the output. All channels whether its individual channel, sends or bus, routed to the master fader.
Ableton Arrangement View

Ableton arrangement view can be accessed in two ways.
- Session/Arrangement toggle buttons located at the upper left corner of the interface
- View menu> Arrangement
The different parts of the arrangement view are shown in the image above. We will go through each part one by one.
Arrangement Window: Arrangement window works as the main editor panel of Ableton live where we edit the clips with the given editing tools.
Channel Setting: However most of the channel setting tools are available in the session view where we can add effects, pan, volume, select input and outputs for the channels, some settings are also available in the arrangement view. You can use this section to quickly apply settings to the channels without toggling into session view.
Master Channel: Master channel (master fader) is also avabaile in arrangement view.
Transport Bar: Its available globally that means its visible in all the views. You can use the transport bar to play, pause, record etc.
Editing Tools: Editing tools like cut, paste, glue etc are available in the editing toolbar located just above the arrangement view.
Clip editor: Clip editor is used to editing the clips individually. You can use it to edit clips with extra precision.
Ableton Live Browser

Ableton is the kind of audio programming software where you can program your music with virtual instruments and samples. The browser feature is the most important feature in Ableton live which is the gateway to the tons of instruments and samples.
With the browser, you can import pre-made instruments as per your need. In the default installation of Ableton live you will get approx 25GB of virtual instrument and sample library which I think is enough for a home studio.
If the browser is not open in default in your Ableton live window, you can easily open it by pressing “ctrl+alt+B” or go to View>Show Browser to open it.
You can locate the browser feature at the upper left section of the session/arrangement view.
How to Use Ableton Live Browser?
At the left side of the browser window, you can see different categories like sounds, drums, instruments etc.
When you click on your desired category, several subcategories will show at the right side of the window (Name).
Now click on the arrow show beside the subcategories to access the related sounds, instruments, presets and other stuff.
When you accessed the desired stuff Select a track or open a new one and just drag that stuff to the Sampler Window.
Note: For Midi instruments, select an existing or new Midi track. For Audio tracks and effects select an audio track.
Groove pool
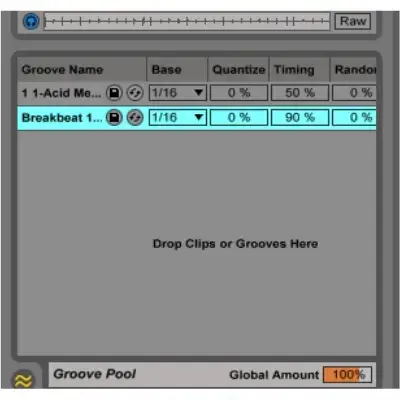
Ableton Groove Pool is located just below to the Browser. It is used to import the-made groove (beats) from the browser library to your session. You can also save you own made grooves by just dragging in the clips into the groove pool.
Its very simple. You just have to drag the desired clip from the arrangement window to the grove editor.
When you drag the clip into the groove pool you will be asked to set the name, base, quantize and timing of the clip and then you can save this clip to the user library in the browser.
Ableton Live Preferences

Abelton live preferences can be accessed from the options menu or you can press “ctrl+,” keyboard shortcut to access preferences window. Here are the settings which Ableton preferences window provide us.
- Look and feel: This setting is used to change the default look and feel of the Ableton live interface.
- Audio: This option is used to set up the audio interface, latency etc.
- Midi/Sync: This option is used to set up the input output for the Midi instruments and devices.
- File and Folder: It’s used to change the files and folders settings for the clips.
- Library: Here you can set up the folder for the library.
- Record warp launch: this setting is used to warping and launching samples
- CPU: You can setup CPU usage here.
- Licence maintenance: This menu is used to maintain the licence of the software.