So, what is EQing? An equalizer is simply a tool that lets you adjust the volume of the individual frequencies within an audio source.
Rather than a volume fader, which would allow us to adjust the overall volume, an equalizer allows us to just turn up or turn down individual frequencies and individual elements of that sound.
Every instrument has a fundamental note. As well as that fundamental note, it has overtones.
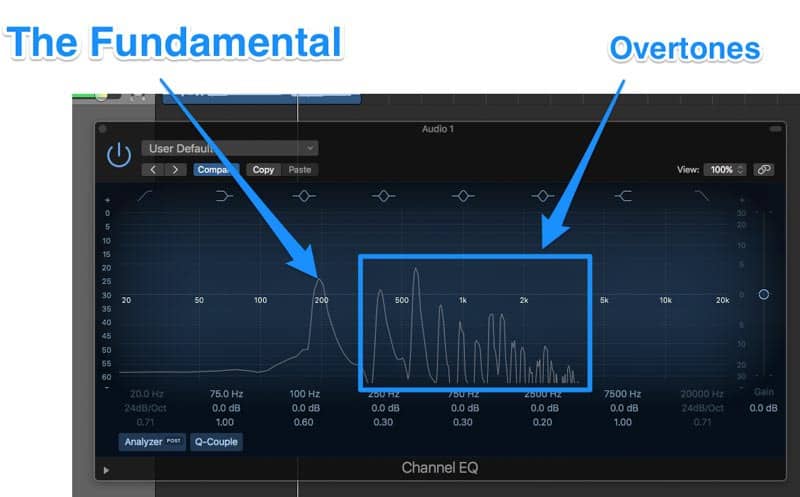
That’s what gives an instrument its tone or its character, its timbre, and that’s why a bass guitar, for example, sounds different to an organ.
By adjusting these frequencies, by cutting certain frequencies or boosting others, we can adjust that tone and change the timbre of the instrument.
Now, it’s important to bear in mind that you can’t completely change the sound of an instrument with EQ alone. All you can do is work with what’s already there.
In the recording phase, you decide what tone you want, and then you use EQ to scope that and make small changes to take it further towards your end goal.
How to Use an Equalizer by Learning the Frequency Spectrum
Before you can truly learn how to use EQ, you need to understand the frequency spectrum. You could use an EQ chart for this, but let’s just take a look at an EQ plugin instead…
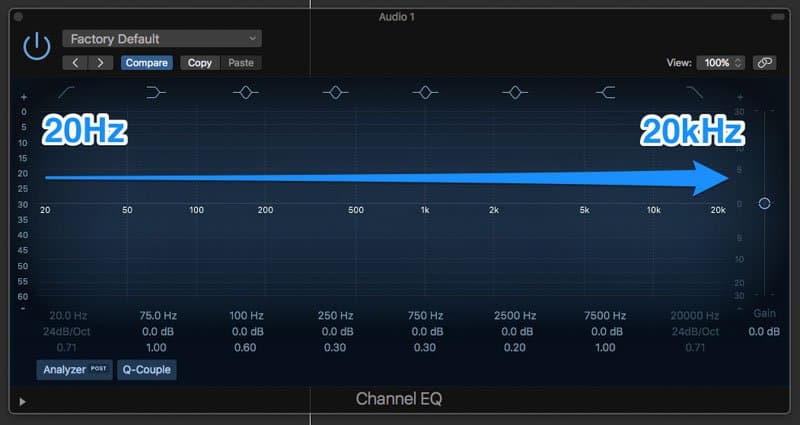
We go from left to right, and we start with 20 hertz.
Then on the right we’ve got 20,000 hertz, or 20 kilohertz.
This is the range of human hearing.
Now, none of us will actually be able to hear 20 kilohertz. When you’re first born you can, but as you get older, your hearing lowly degrades.
But you will still hear the impact of 20 kilohertz – so don’t ignore it.
Bass is on the low end (left). You can feel 20 hertz if you’re on a really large sound system – but not necessarily hear it.
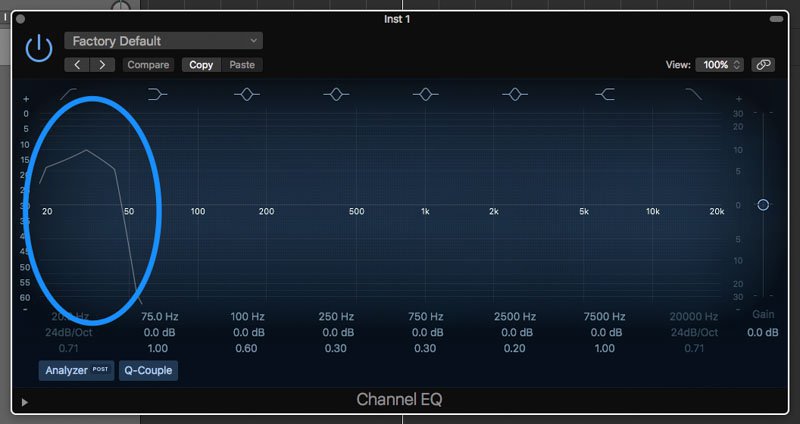
In between these two extremes, we’ve got the human range of hearing.
For me, this breaks down into five very distinct sections.
Sub-Bass (20-60Hz)
The first area we’re going to focus on is sub-bass.
Everything below 60Hz is sub-bass, so generally you need a subwoofer or a good pair of headphones (open-back headphones, for example) to hear that.
You should be able to hear it a little bit if you’re on monitors or headphones. But if you’re listening on a laptop or a phone, there’s no way you will hear that.
Bass (60-200Hz)
After that, we get into what I would call bass. For me, this is everything between 60 and 200 hertz.
In this area, we’ve got lots of bass guitar. Lots of the low-end vocals as well, because male vocals are going to have the fundamental below 200Hz in most cases.
Low Mids (200-600Hz)
Next up, if you go from 200 up to 600 hertz, this is what I would call low mids, and this is a really important area for mixing.
Now, this area is crucial for home recording, because this is where you get a lot of buildup with guitars, vocals, even the top end of the bass guitar especially.
This is an area that’s really guilty for adding mud to a mix.
Mids (600Hz-3kHz)
The human hearing focuses mostly on this frequency range…
So it’s crucial to get this range right. You want the main focus of the track (e.g. vocals) to have lots of room in this range.
Be aware that this is also where you can start to get into harshness and aggressive tones.
Upper Mids (3-8kHz)
Then we’ve got upper mids between 3 and 8 kilohertz, and this is where things really start to get harsh. This is where we have brittleness a lot of the time.
It’s also an important range for clarity and aggression, especially in vocals.
Highs (8kHz+)
After that we get to treble, or the highs. This is everything above 8 kilohertz. This is where we have air.
You could split this even further into 8-12kHz, and that’s what I would call treble, and then 12kHz+ is what I would call air.
But for now, we’re just going to leave this as the highs, and this is everything above 8kHz.
Frequency Range
|
Description
|
| 20Hz-60Hz | Sub-bass |
| 60Hz-200Hz | Bass |
| 200Hz-600Hz | Lower mids |
| 600Hz-3kHz | Mids |
| 3kHz-8kHz | Upper mids |
| 8kHz-20kHz | Highs |
So there you go. That’s a breakdown of the entire frequency spectrum.
I recommend you learn this EQ mixing chart by heart.
Now, let’s learn about EQ’s.
EQ’s are tools that a mixer can use to boost or cut any of these frequency ranges. They’re the most frequently used tool in a mix.
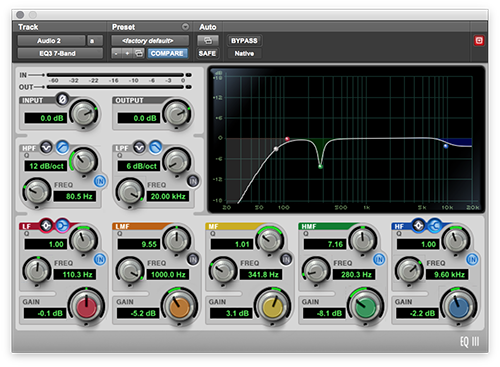
Let’s look at the different parts of an EQ:
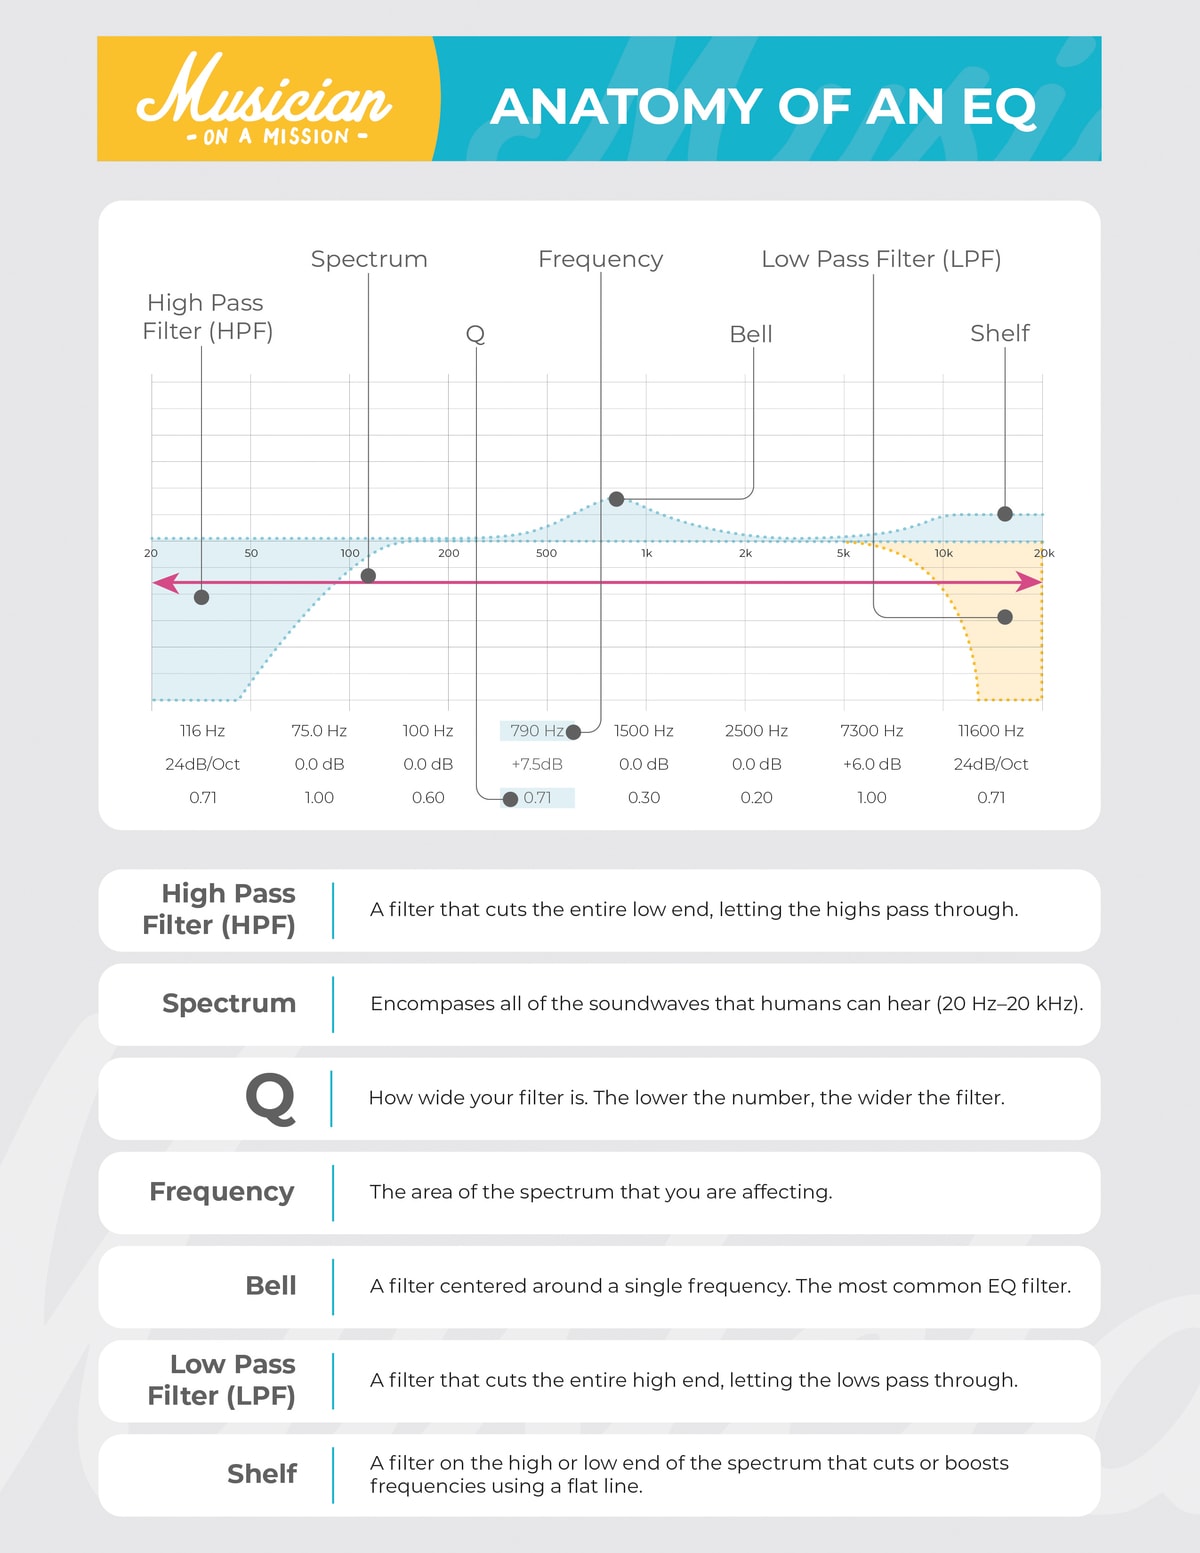
Now, a quick activity for you…
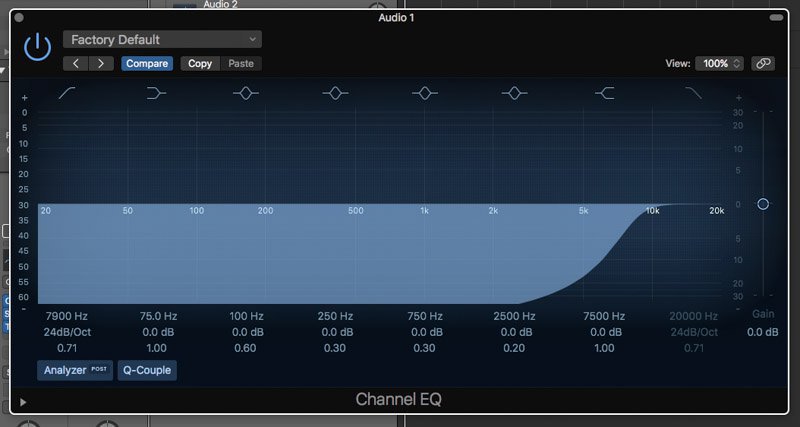
Set a high-pass filter at 8kHz to listen to everything above that frequency. This type of filter lets the highs pass through – it’s cutting out the lows.
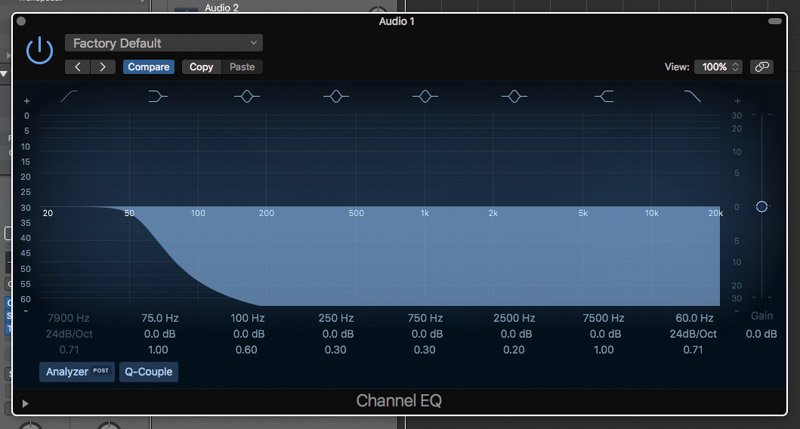
Then we also have a low-pass filter, which you can set at 60Hz to hear the sub-bass. This is doing the same thing; it’s cutting out everything above the frequency that we set, so it’s letting the lows pass.
In addition to filters like that, we also have band, or bell boosts, some people call them.
This is where we’re just boosting individual frequencies.
You choose a frequency, like 450Hz, and then you’re boosting that frequency and everything around it.
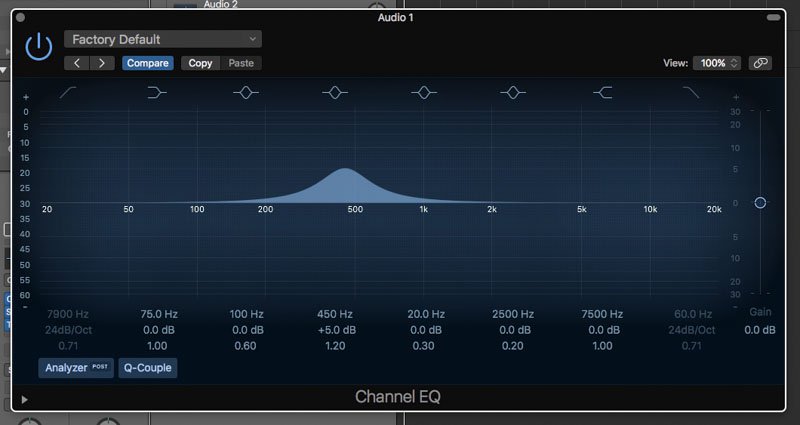
You can also control how narrow boost/cut this is. When you make it really wide, you’re still boosting 450Hz, but you’re also boosting loads of other stuff.
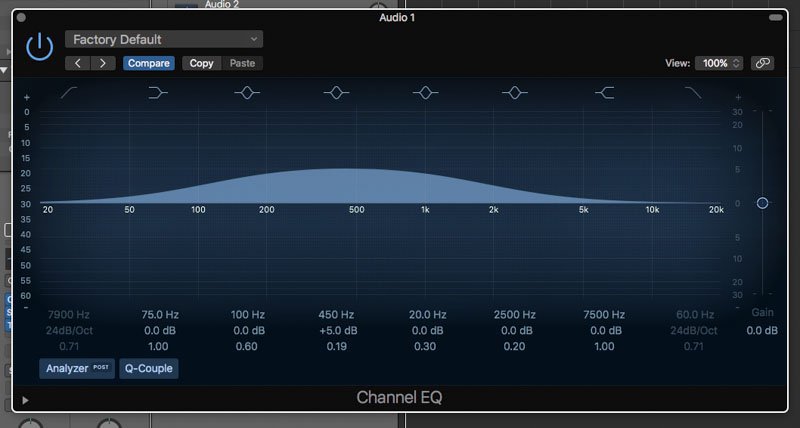
Generally, you want to use narrow for cuts and wide for boosts – but that’s a big generalization.
When you’re starting off, that’s a good thing to remember. As you get more confident, you’ll start to use smaller boosts sometimes, and wide cuts too. But generally, narrow for cuts, wide for boosts.
And then we have shelves as well. This is where you boost/cut everything above or below a certain frequency.
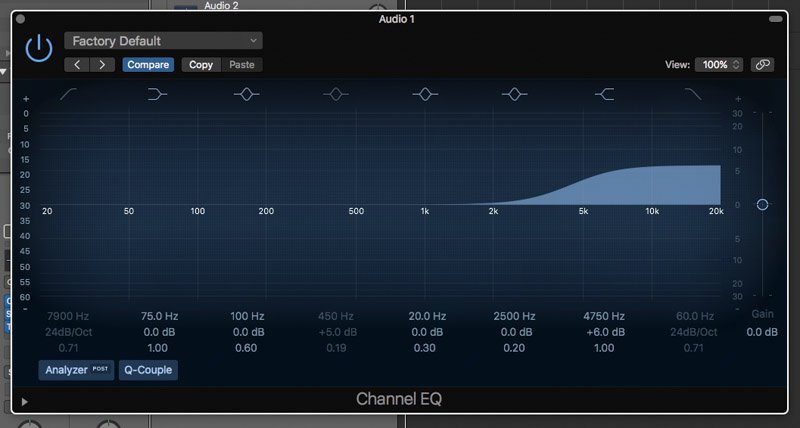
For example, you could boost or cut all the highs above 12kHz. This works in a different way than the filter, though.
With the shelf, you’re just cutting everything by a single amount, like 6dB. A filter, on the other hand, is removing all those frequencies completely.
Generally, I use high shelves for a top end boost, especially on vocals, acoustic guitars, and generally on the whole mix as well, maybe everything above 12 kilohertz. We can also use them for low cuts if we just want to reduce the bass in a vocal, for example.
How to Use an EQ Chart
EQ charts are a great way to learn to make intentional decisions when using an EQ.
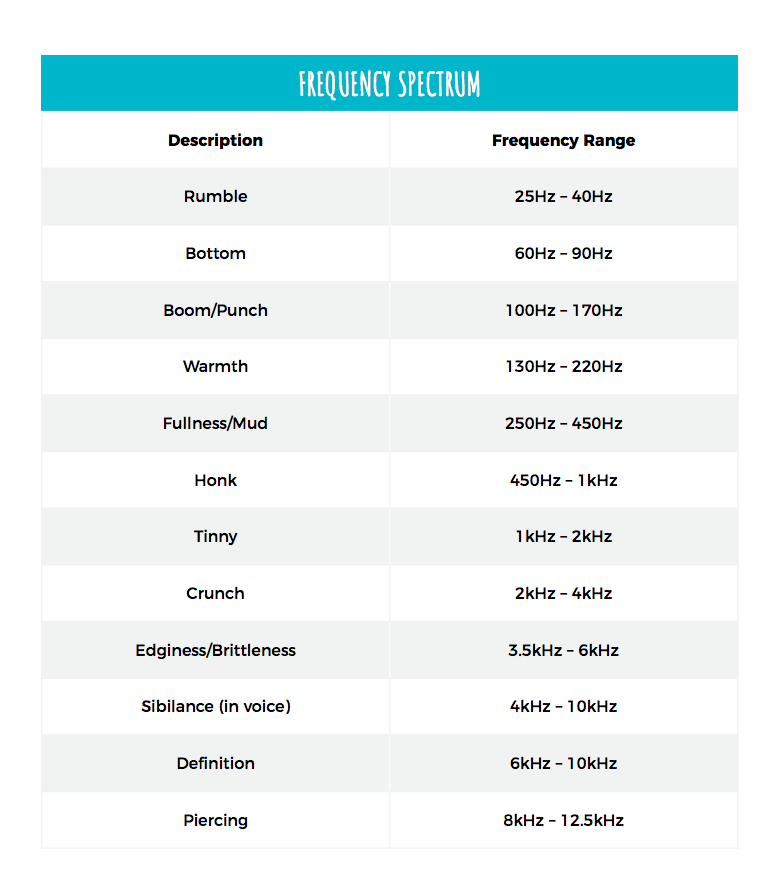
Essentially, they break down the entire frequency spectrum and use descriptive words to explain each frequency range and how it sounds.
The point of an EQ is to balance the frequency spectrum. These charts are helpful when you’re trying to figure out where the sound is unbalanced.
Learn these frequency charts by heart and you’ll get significantly better at EQ. If you know something sounds brittle, that’s going to be the upper mids; if you know something sounds muddy, it’s going to be the lower mids, for example. It’s easier to find the locations of the problems you hear.
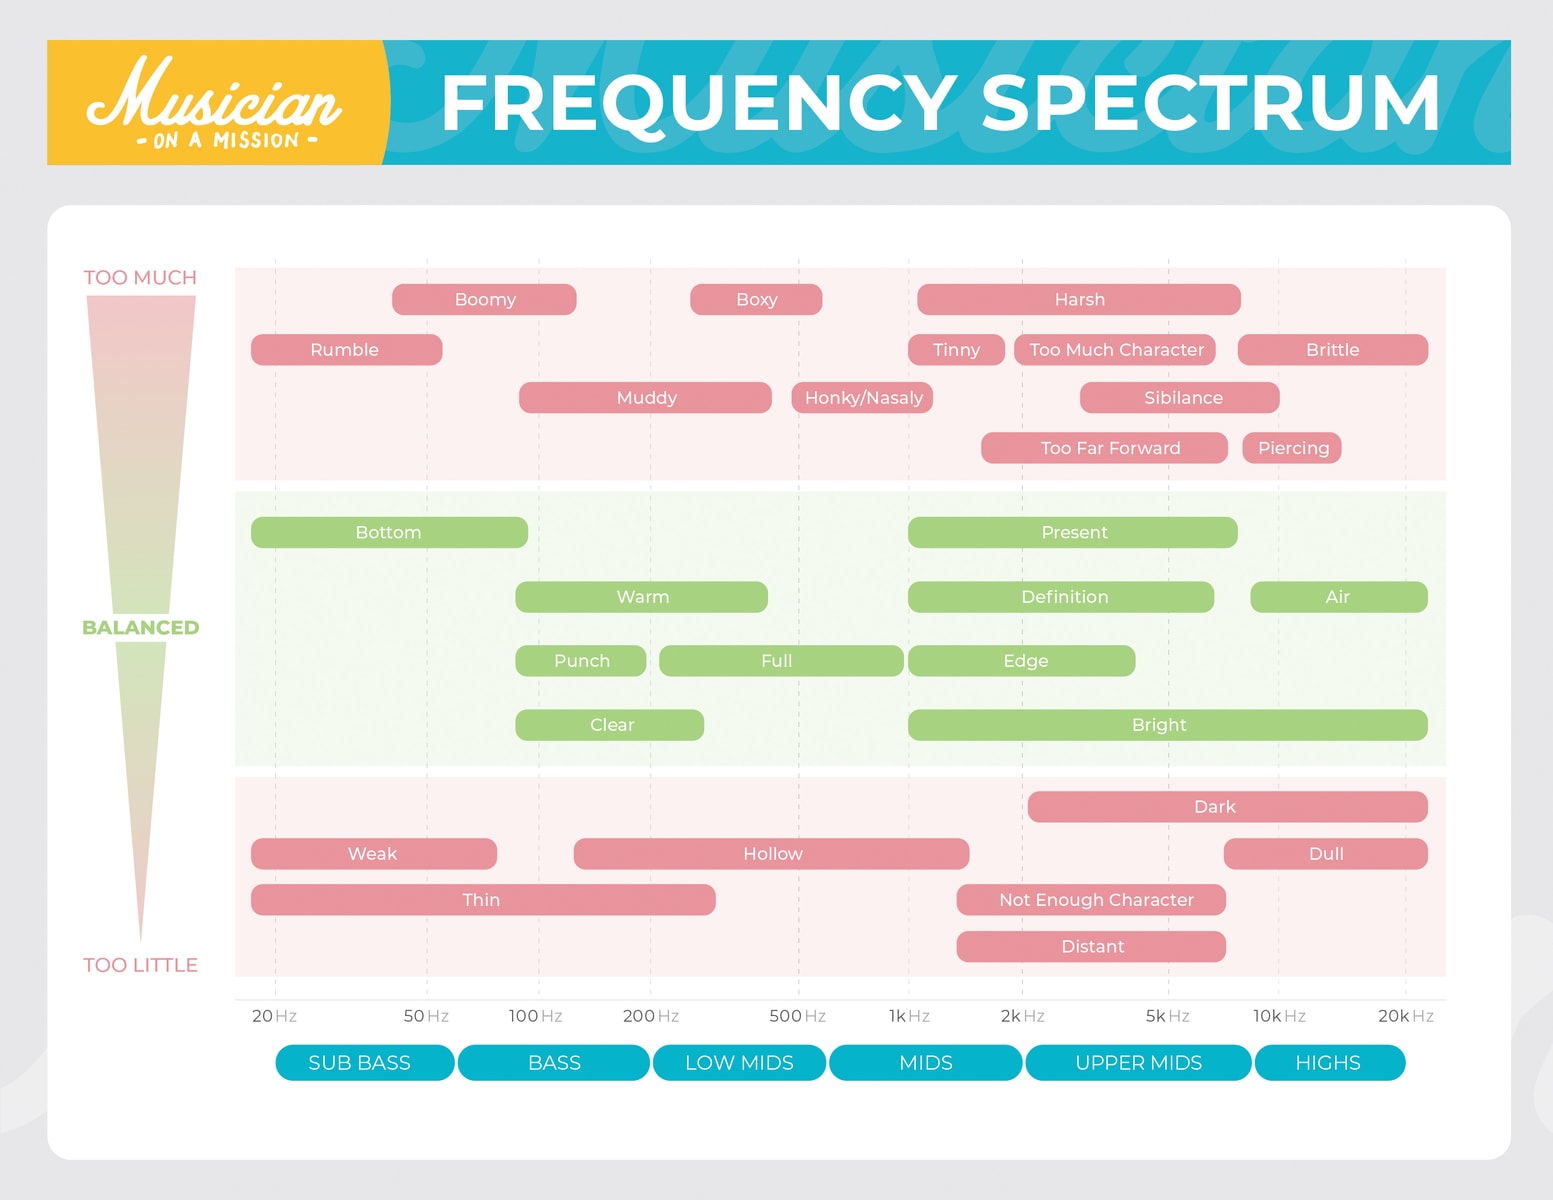
While listening to an instrument, think: what does this sound like to me? If you’re using green words, great. But if you’re using any red words, it may be time to bring out an EQ.
It’s also important to realize that EQ moves aren’t black and white.
Sometimes, you might listen to an instrument and think it sounds thin (which, according to the chart, means it’s lacking low end). So you’ll reach for an EQ and boost the low end. But that doesn’t help like you thought it would. It just makes the sound more cluttered.
What’s going on?
Sometimes an instrument you think is lacking energy in one area actually has too much energy in another area, or vice versa. It makes the sound unbalanced.
So, if you boost the low end, and it sounds more cluttered, it may actually have too much energy in the upper mids. You make a cut around there, and all of a sudden the instrument sounds balanced.
The moral of the story: use your ears! If you think a particular mixing decision will sound good and it doesn’t, don’t keep it just because you think you should. Do some problem-solving. There’s probably something else you could do to achieve the same result.
Now, a few warnings:
These charts are great for learning what different parts of the frequency spectrum sound like, but make sure to keep them from becoming a crutch. These are great learning tools, but shouldn’t be referenced constantly.
Eventually, you want to have memorized this chart by heart. Your workflow will get much faster, and you won’t be overusing your EQ’s (which can take the life out of your music).
Also, avoid ANY EQ charts that are specifically about one instrument. Not all sounds are created equal.
No one guitar sounds like another.
No one snare sounds like another.
Using an EQ chart that’s for just one instrument will give you lots of information, yes, but it’s info that doesn’t apply to YOUR version of that instrument. Since you’re making decisions based on false information, it will make your mixes sound worse.
Okay… now we’re ready to dive into those 4 key approaches.
Make EQ Simple by Using These 4 Key Approaches
Okay, we’re getting somewhere. Time to talk about strategy.
Forget everything you know about EQ.
Let’s keep it simple…
There are only four ways to approach EQ. Think of your equalizer as four completely different tools depending on how you use it.
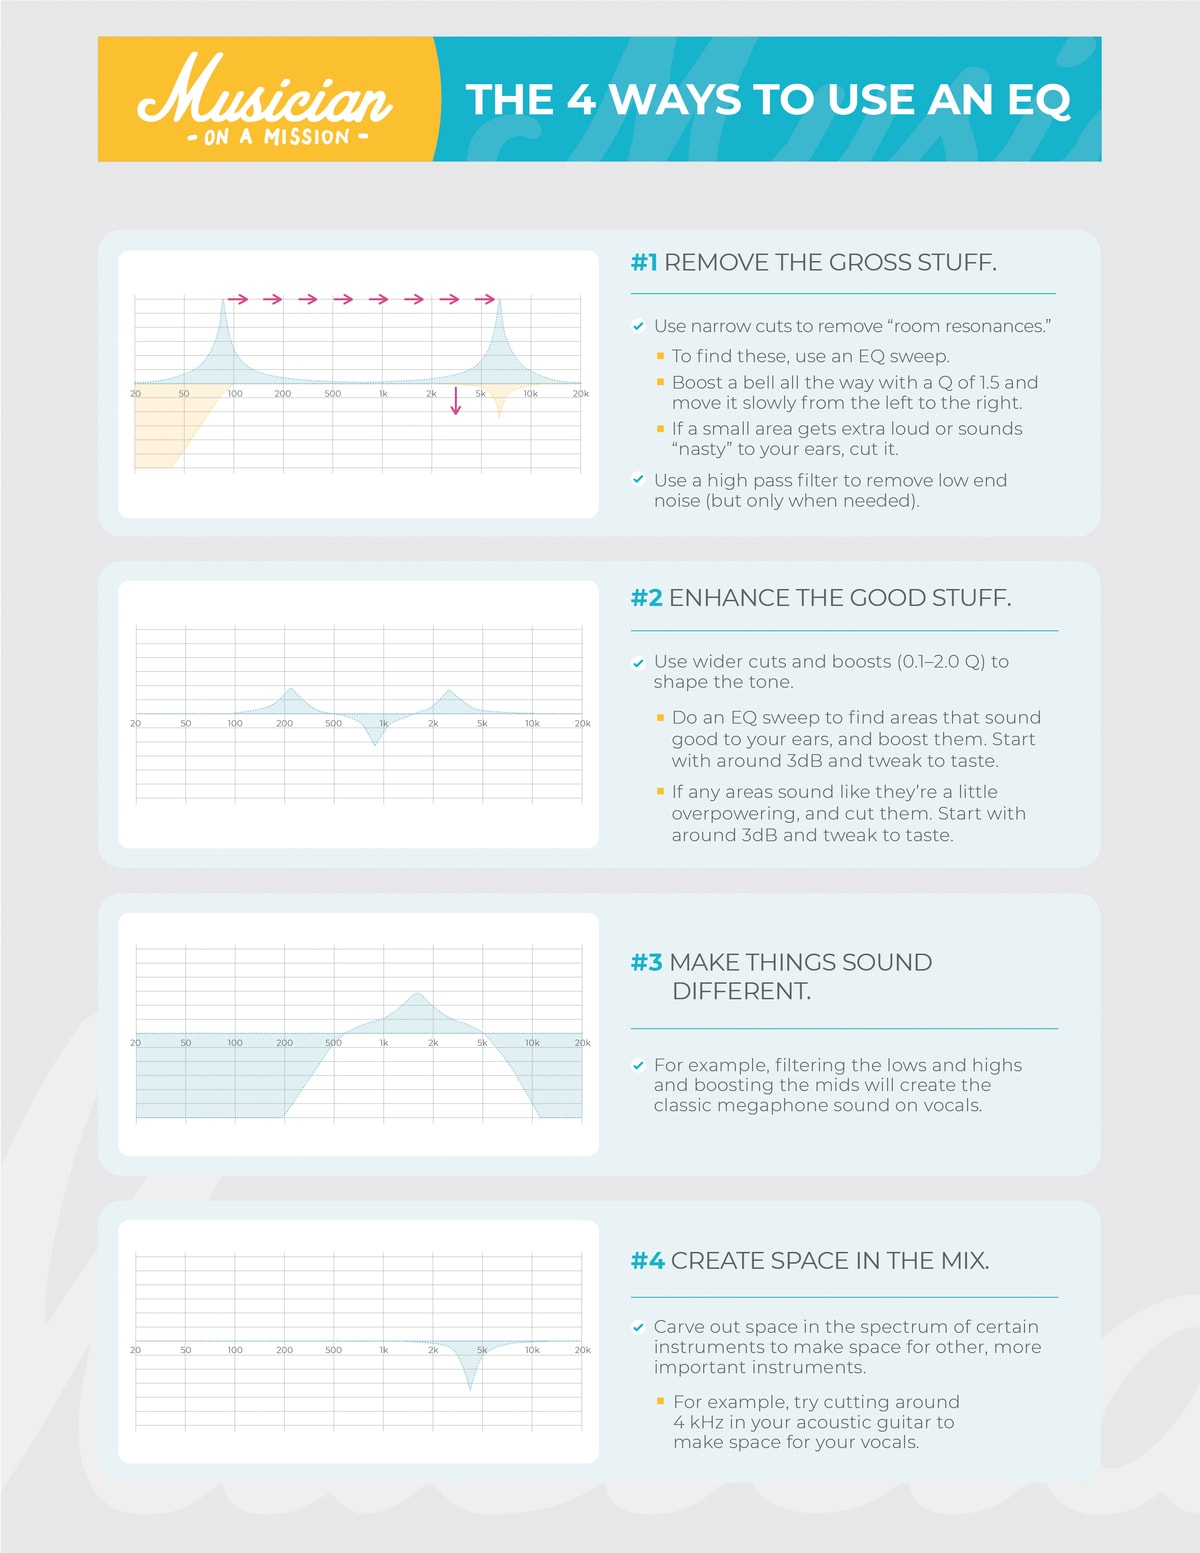
Approach 1 – Remove Nasty Elements
Let’s go into the first approach, which is how most people start off.
This is using EQ to remove nasty elements.
Using narrow bands to remove nasty elements, what I call surgical EQ, can really clean up any sound source, BEFORE you’ve even done any tonal shaping.
By simply removing nasty elements, you make more room for the good stuff to come through.
What you’re doing is surgically removing certain frequencies. It’s surgical because you’re using a really narrow cut.
If you can remember earlier in this guide, I said about using narrow bands for cuts and broader bands for boosts, and that’s exactly what you’re doing here.
So there’s three different techniques you can use to do this.
Technique #1: The Sweep EQ Technique
This technique is fairly simple.
All you do is boost a narrow band and sweep around until you find a nasty sound. What you’re listening for is a sudden increase in volume, because that suggests that there’s lots of that frequency – which probably means it’s a room resonance, because every room will have certain frequencies that resonate.
Once you find the frequency range, just cut it out by 2-10dB. I normally find one or two problematic ranges on important parts like vocals, guitars, snares etc.
Generally, you want to avoid the solo button when mixing.
But when using this approach of removing nasty elements, it’s okay to solo the channel. You can even do these surgical cuts BEFORE you start mixing, in the preparation phase.
This first approach also includes using high-pass filters to remove low end noise when necessary.
But don’t go crazy with this – only use high-pass filters when you notice low end noise that needs removing, or you have another specific intention (like tightening up the bottom on a bass guitar).
Don’t just use high-pass filters on everything, otherwise your mix could end up sounding thin and weak…
Technique #2: The EQ Chart
We went over this above, so no need to dwell on it.
Basically, listen to the sound and start describing it. If you’re using “red words”, then try looking in those areas for a place to cut.
Use the chart as a reference for where these areas are.
Technique #3: The Vowel Technique
This one is weird, but extremely effective.
Basically, your voice can help you find problem areas in the frequency spectrum.
Stay with me here.
Without getting into the deep dark depths of formant theory, the vowel technique is based on this rule: when your voice produces vowel sounds, it’s actually creating energy in a specific area of the frequency spectrum.
You can use these vowel sounds to determine what part of the frequency spectrum needs to be turned down to balance the sound.
Here’s the chart. For the full effect, whisper each word as airily as you can and hold out the first vowel sound.
Frequency
|
Word
|
| 250Hz | Boot |
| 500Hz | Tow |
| 1kHz | Father |
| 2kHz | Bet |
| 4kHz | Beet |
| 6kHz | Kiss* |
*For the last word, hold the “ss” sound, not the vowel.
We’re whispering the vowel because it spreads out the frequencies across that particular area, making it easier to compare it to your mix. Think of it as turning your voice into white noise.
If you want to test this technique out for yourself, open up your DAW and bring up a white noise generator. Most DAWs have these, but if yours doesn’t, there are several you can download from the internet for free.
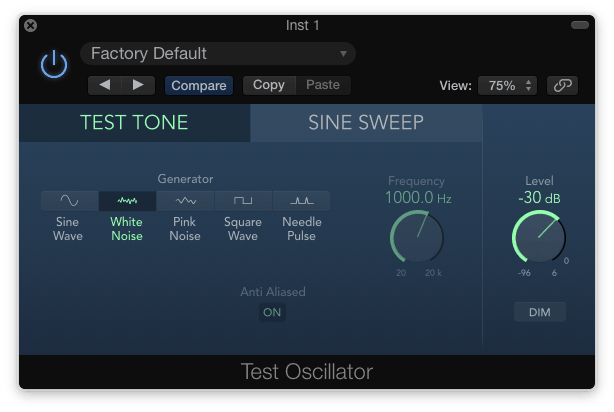 Next, bring up an EQ. Set one of the bands to a Q of 2 and boost it as high as it will go.
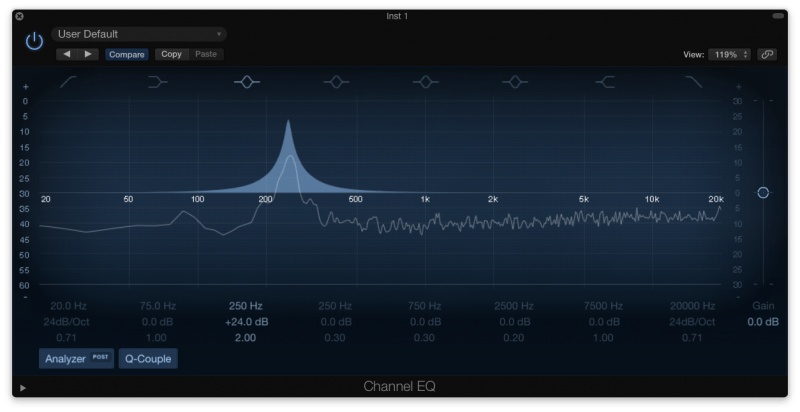
Put the band at 250Hz, then hold your whispered “boot.” Can you hear how similar they sound?
Next put the band at 500Hz, and hold your whispered “tow.”
Keep doing this for all of the vowel sounds. You’ll realize how similar they are!
This is a STELLAR system for figuring out problem areas in your instruments. It helps you to mix faster while staying accurate.
All you have to do is whisper these words one-by-one, then stop at the word that has the frequency you’re looking for. Then grab an EQ, and look around that area for some of the nasty sounds.
Unfortunately, it’s not a perfect system. You can’t make vowel sounds that are in the low end or high end, so finding problem areas there will take some extra work.
There’s a handy workaround, though. If I can tell there’s some nasty stuff in an instrument and I go through each of the words with no results, I at least know where to look.
It’ll show the problem’s either in the low end or the high end! You know where to search once you have that knowledge.
This is a very powerful technique. You’ll sound a little silly, but be okay with it. It’ll get you BETTER results FASTER, and it will impress your friends.
Approach 2 – Enhance the Pleasing Elements
Once we’ve removed the nasty stuff, you can move on to approach #2, which is enhance pleasing elements.
For this, I prefer to use an analogue modeling EQ, but it’s by no means necessary.
Here are my recommended plugins:
- Stock EQ – A lot of DAWs now have a stock EQ that models an analogue unit, don’t upgrade for the sake of it!
- Slick EQ – A great free option.
- Slate VMR – You get two awesome equalizers with this versatile plugin.
- Waves SSL E-Channel – A classic plugin that always sounds great.
Okay, back to this approach…
Lets use the example of applying EQ to a vocal with a 2dB boost at 6 kilohertz.
That’s probably because I thought the aggression in the vocal was nice. I sat down and I thought, “What about this vocal do I want to enhance?” It already sounded clear, but I wanted to enhance the upper mids and give it a bit more aggression and treble, which is why I’ve got a boost here.
So there you go – enhance the pleasing elements that are already there.
You can’t introduce new elements. That’s not how EQ works. You can only enhance what’s there, so that’s why you need to make sure it’s a good recording and you like the tone in the recording phase.
One more thing…
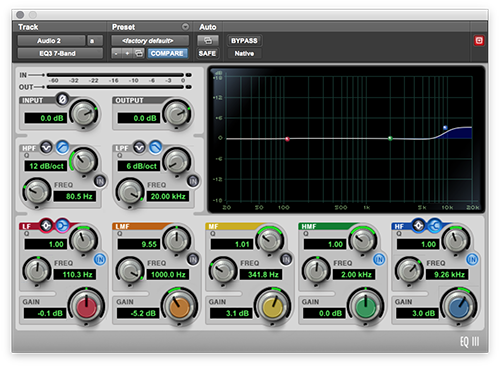
This is also the phase where you are most likely to use shelves.
If something sounds too bright, you could cut a couple of dB’s at 10kHz with a high shelf. Or if something sounds too bassy (but you don’t want to completely remove the frequencies with a filter) use a low shelf to reduce everything below 300Hz.
But be more careful when using shelves to boost frequencies. I wouldn’t recommend using a low shelf to boost bass.
But you can certainly use a high shelf to add a bit more air to an acoustic guitar or vocal, for example. I do this all the time.
Approach 3 – Make Things Sound Different
This approach is just to make things sound different.
For example, you could filter out all of the top end and low end on a vocal to give it that ‘telephone’ sound.
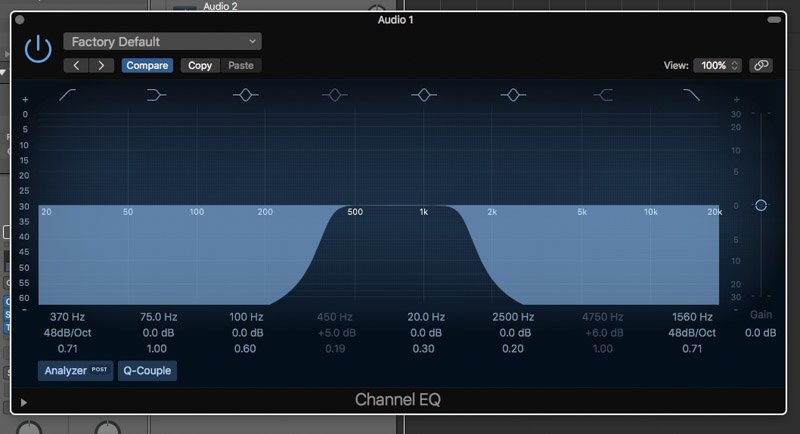
Making things sound weird and different with EQ is a great way to add interest and variation to your mix – especially if you only do this in specific sections or phrases.
Approach 4 – Create Space in the Mix
And then finally, we’ve got approach #4, which is to create space in the mix using range allocation.
This is a really good way to create separation and space in your mixes.
Essentially, this is the act of never boosting two parts at the same frequency.
Instead, once a frequency range has been ‘allocated’ to a particular part, you probably want to cut that frequency in other instruments.
THIS is how to use EQ to create separation and clarity in your mixes.
By cutting frequencies in some instruments and boosting them in others, you can create space in the mix and give each part its own place to sit, its own pocket in the frequency spectrum.
10 Essential EQ Tips To Try Today
Now that you have the strategy down, I want to share some more tips that I have picked up over the years.
You’ve got the basics down now, but if you want to use EQ like a true professional, keep reading.
Tip 1 – Have an intention
I can’t stress this enough.
Don’t just randomly start boosting and cutting different frequencies to see what works and what sounds good. Instead, decide what you want to achieve first, and then figure out how you can achieve it.
Let me give you an example. I’m mixing a vocal, and it sounds a bit muddy. It’s not cutting through the mix enough, and it’s kind of clogging up the mix.
Once I know that, I can think “Okay, the low mids are probably where the problem is; that’s going to be making it muddy.” So I can try to cut at around 400 hertz, and then I can move it around, try 300, try 500, decide on where the best frequency is, where the sweet spot is, and then suddenly the vocal sounds less muddy and the mix opens up. So decide what you want to do first.
Tip 2 – Don’t rely on EQ alone, especially to shape the tone
You need to shape the tone in the recording phase, because the tone that you capture there is going to be what you’re stuck with. You can use EQ to make it even better, you can use EQ to shape it slightly more, but really the tone is decided in the recording phase.
Tip 3 – Prioritize cuts, but still use boosts
I can remember the first time I learned about subtractive EQ (a long, long time ago).
I understood the principles, but I found the concept extremely daunting.
Whenever you boost with an equalizer, it messes with the phase of your recording and affects additional frequencies. Not just the frequencies that you are boosting.
The idea was that aggressive boosts can quickly ruin your audio, making it unnatural and difficult to mix. Add to this the fact that boosting the volume of a track reduces your headroom, and it’s easy to see why boosting should be avoided where possible.
So in principle we should try to stick to subtractive EQ. Never boost (unless we absolutely have to) and try to only cut.
But in practice, this isn’t so easy to stick to…
And with modern plugins, the downsides are minimal.
I remember thinking “how am I going to get my vocals to sound more aggressive without boosting on an EQ?”
Listen…
This idea of ONLY using subtractive EQ is ridiculous.
I could never finish a mix in that way.
Any time somebody tries to give you a hard and fast rule about mixing, it’s probably bullshit.
OF COURSE you can use boosts when you are mixing.
If you have an intention, and you need a boost to get there…
DO IT.
My advice is to prioritize cuts, but use boosts when you need them.
Tip 4 – Avoid applying EQ in solo
Instead, try just bringing up the channel a bit.
If you’re struggling to hear the changes that you’re making, if you’re only doing a 1dB or 2dB cut or boost and you’re struggling to hear it in the context of the mix, bring that channel up a bit so you can hear it a bit better, because then you’ll be able to hear your EQ change, but you’re also going to still have the context of the mix.
Whereas if you apply EQ in solo, you can quickly forget about the rest of the mix and how that instrument sits. Plus, it helps to learn how to EQ with the whole mix going.
No one’s ever going to hear your mix in solo. They’re never going to hear the guitar in solo, so it doesn’t matter if it sounds good in solo. It needs to sound good in the mix.
A lot of the time, things sound really bad in solo, especially with electric guitars. So try to apply EQ in the context of the mix – or you could trick yourself.
Tip 5 – Small changes soon add up
This one is more for beginners.
When you’re starting out, try to stick to cutting or boosting by no more than 5dB.
Lots of small changes across your mix soon add up.
As you get more confident, you can get more aggressive.
Tip 6 – Be more subtle with stock parametric EQs
Boosting by 10dB or more sounds great when you are using an old analog desk and the EQ section is amazing. It’s adding a lovely color to the sound.
A lot of the time with your stock parametric EQ in your DAW, it’s going to be different. It’s probably going to have some nasty side effects if you start boosting by too much. It’s going to start messing with the phase.
So try to be more subtle with stock parametric EQs. If you’re using an analog modelling EQ, for example, you can be more aggressive.
Tip 7 – Don’t obsess over plugin order
A lot of people ask “Where should I place EQ in my plugin chain? Before or after compression?”
Honestly? It doesn’t matter.
You are worrying about the wrong things.
Sometimes it sounds better before, sometimes after. Just play around with it – but only for a few seconds.
My go-to is to put surgical EQ before compression, and tonal compression after.
It doesn’t necessarily sound best – it just suits my workflow.
Tip 8 – You can’t polish a turd (but you can roll it in glitter)
Only use EQ to remove nasty frequencies (by cutting) or to change the character of a sound and add interest (by boosting).
You CAN’T use EQ to make a poor recording sound good.
You can’t add stuff that isn’t there – only emphasize stuff that is.
Tip 9 – Create instant clarity by removing muddiness
The most problematic frequency range in most home recordings is 250-500Hz (most instruments are heavy in these frequencies).
Your mix will start to sound ‘muddy’ if there are too many of these frequencies evident.
A gentle, wide cut of 3dB between 250-350Hz on the muddy tracks is a great place to start.
Tip 10 – Mix in mono
When applying EQ to your mix, do it in mono.
This helps with range allocation and preventing phase issues. It forces you to create space and separation with EQ, instead of relying on panning.
It will make a huge difference, trust me.
Start mixing in mono, and when you do eventually start panning tracks towards the end, the space in your mix will be immense.
