
When mastering a track it’s crucial to understand the difference between RMS and peak levels. Today I’m going to show you what they are and how we can use them.
Back in the day when I was starting out with making music, I faced the problem of my tracks being too quiet. Even though the „peak volume indicator” showed that my track’s highest volume was around 0dB, it was still too quiet when played alongside professional tracks.
Loudness ≠ Peak Volume
What I was trying to get out of my track is loudness. What I was looking at instead was the highest volume peak in my track. The problem was that my drums included a lot of sharp spikes at the beginnings of samples, so the peak volume was high yet the overall loudness of my track was low. The solution turned out to be RMS monitoring.
What’s the difference between Peak & RMS?
The peak level is defined by the highest peaks within the signal independently of the amount of energy they are representing. The RMS level is proportional to the amount of energy over a period of time in the signal. It’s a little bit like calculating the average peak volume and putting it onto a new scale. To get the RMS value out of a waveform a time constant must be implemented.
How to increase the RMS level?
You can increase the RMS levels in your track by decreasing the dynamic range in your track – to make quieter parts louder and louder parts quieter. This can be done through using tools such as a limiter, compressor or by fixing mix issues.
Most online platforms have a normalization process. This makes the music play back at a consistent volume. When you hear a ‘quietly mastered’ jazz track followed by a ‘loudly mastered’ dubstep track they maintain a constant perceived loudness.

This is implemented so that the audience isn’t always reaching for the volume control, and its generally considered to be a great idea.
Before I get into the juicy details of this post, it’s important that you understand what the ‘LUFS’ system is. LUFS stands for ‘loudness units relative to full scale’. It’s the most accurate way to to measure loudness of audio. I think of it as a more precise RMS value.
Why Does Bouncing My Master at a Specific LUFS Level Help my Music Stand Out on Online Platforms?
Spotify and Youtube stream audio at around -14 LUFS. If a track has a loudness level of -9.5 LUFS (like AC DC Back In Black) both streaming platforms will decrease the volume of that track to around -14 LUFS.

This is GREAT news. It encourages artists to make their music more dynamic and less compressed. If you’re a producer, songwriter or artist you may have heard of the ‘Loudness War’.

The loudness war ideology is ‘the louder your track, the better it will sound to your listeners’. That is no longer necessarily the case. The Spotify scenario is explained further using pictures below.
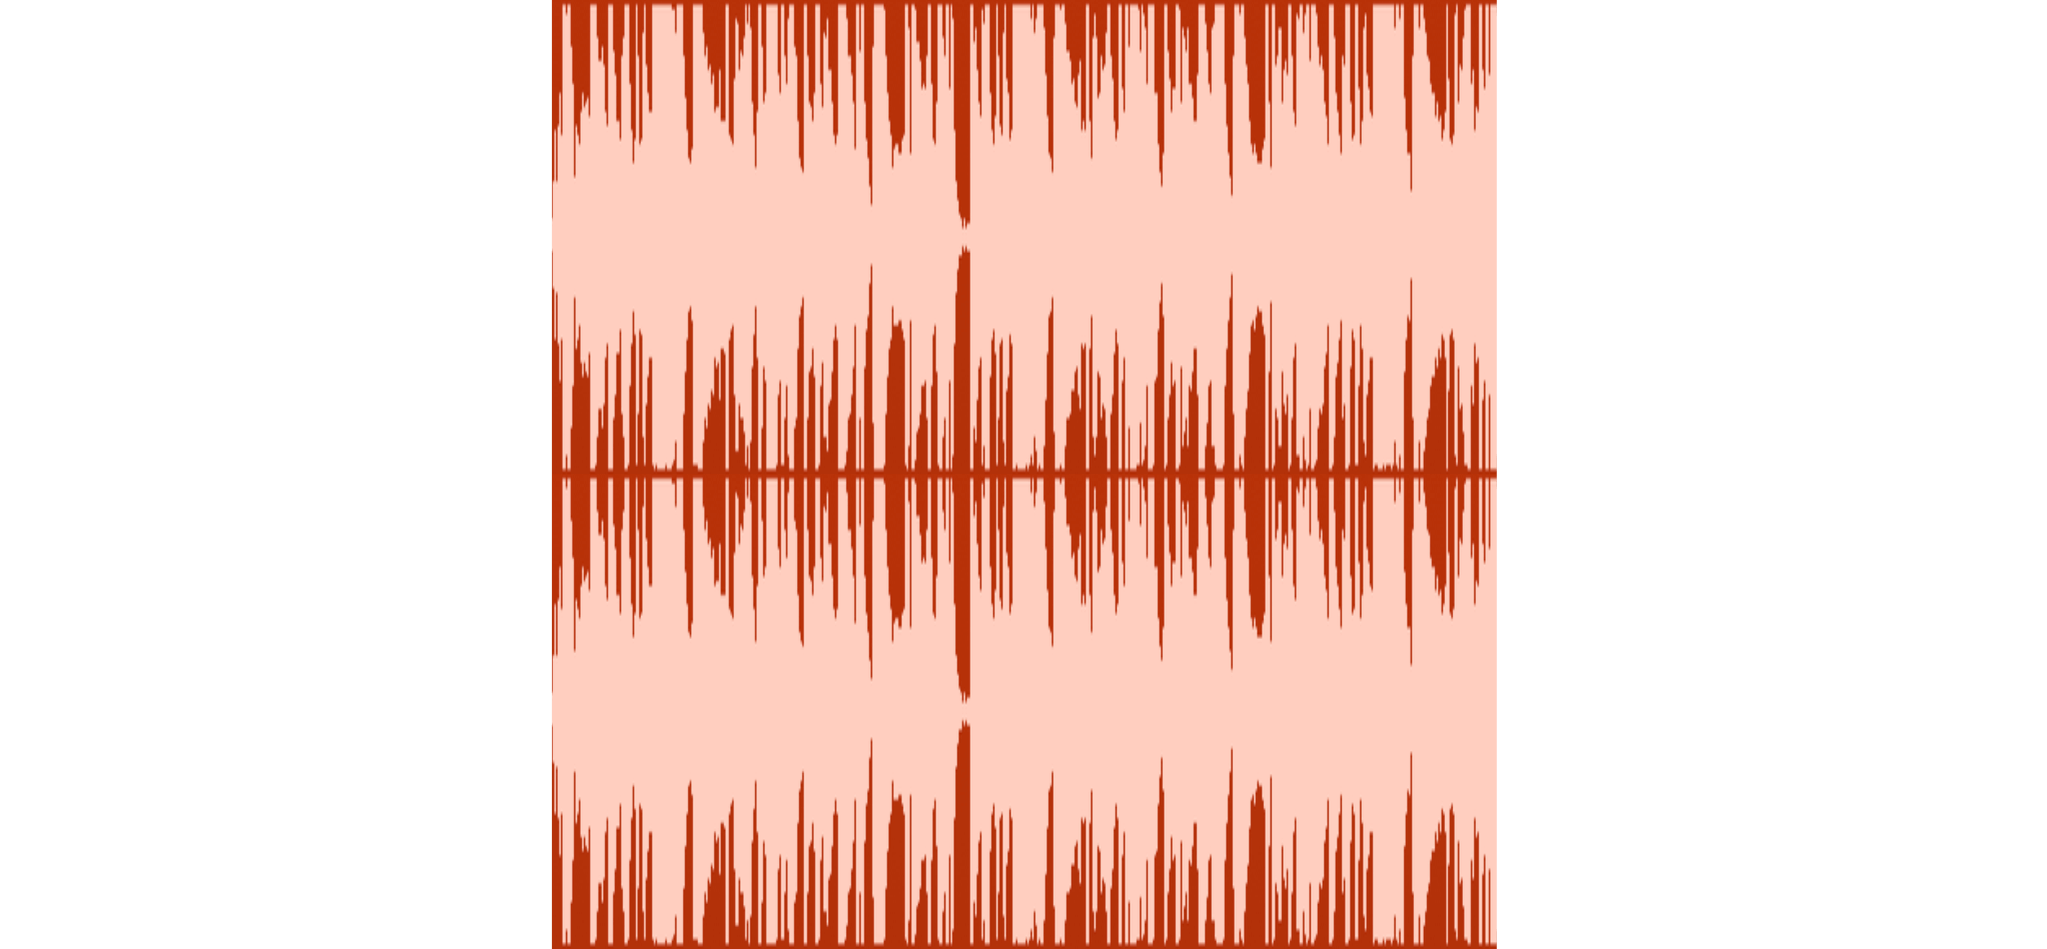
Below in green we see a dynamic track measuring -14 LUFS. You can see just by looking at the waveform that the transients are all in tact and have plenty of room to breathe.

Below in red we see the same track but with compression and limiting bringing it up to -8 LUFS. See how the transients are now all squashed to the same level with no dynamic variation between them.
This makes the track sound much flatter and less interesting. -8 LUFS is the same loudness as many chart topping hits.
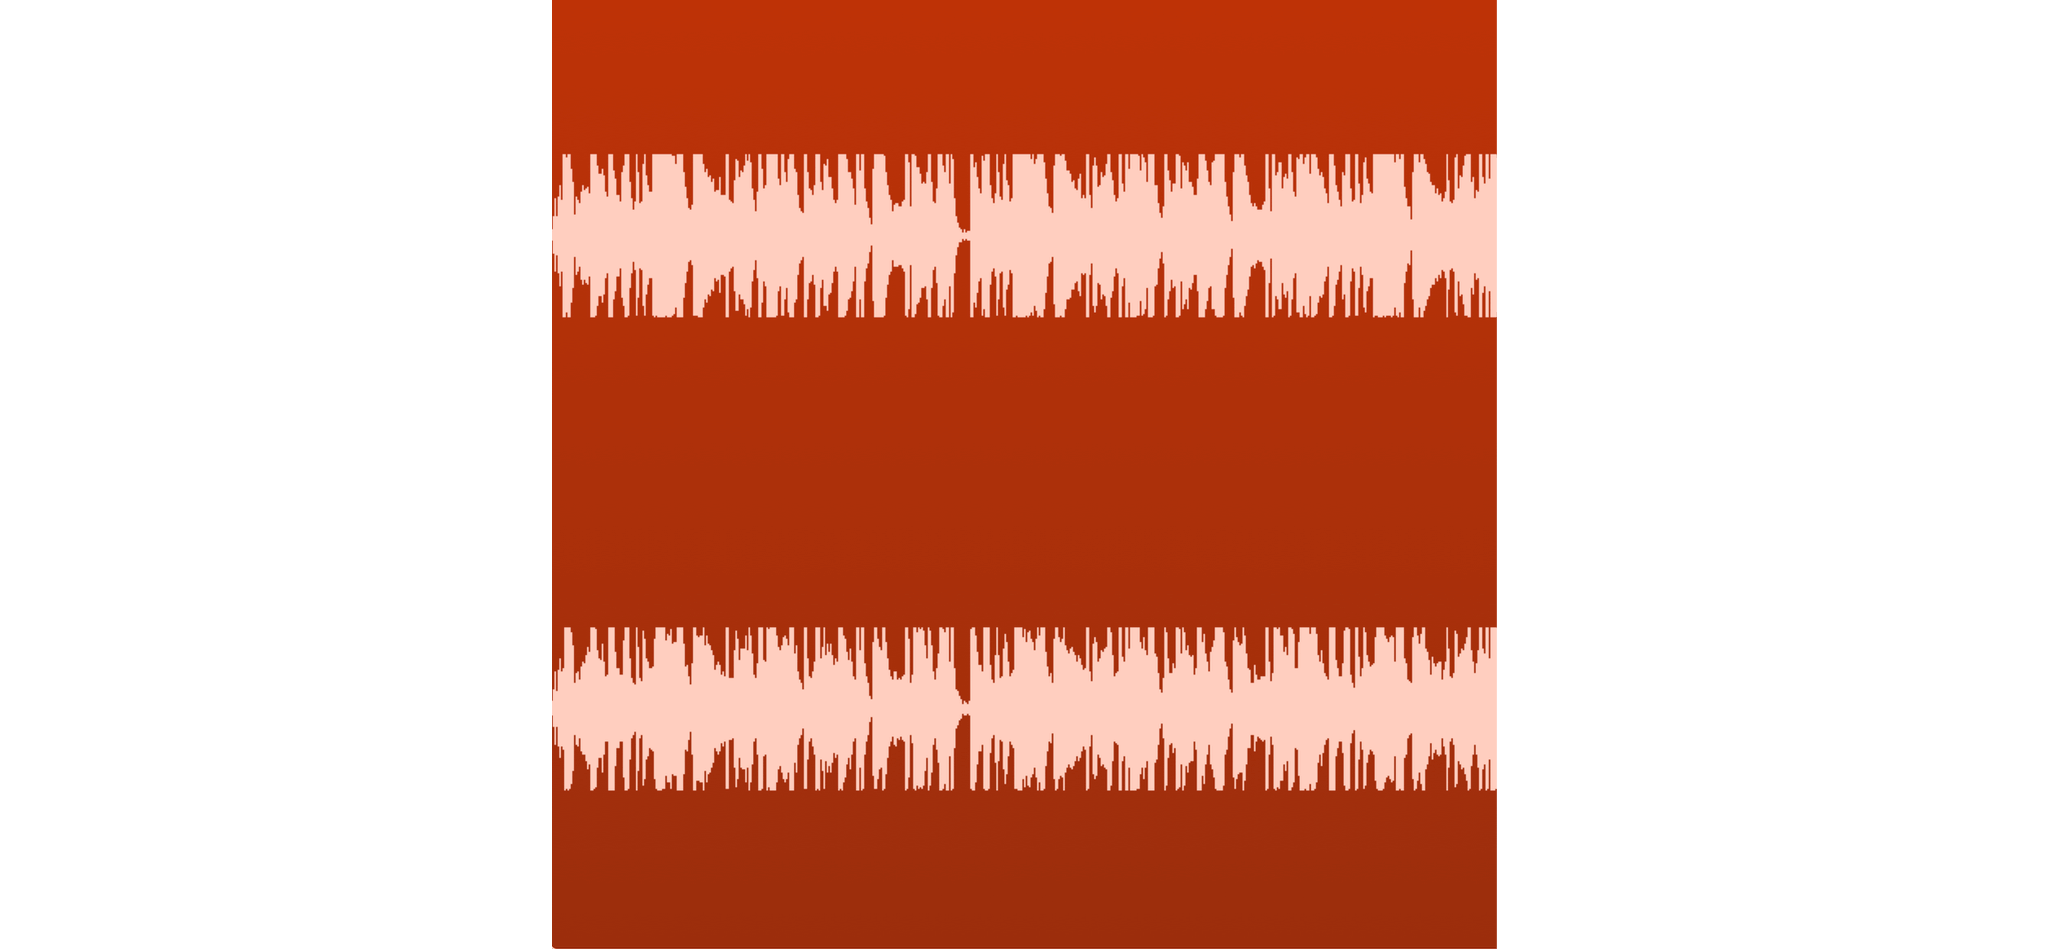
Below in red we see how the waveform would look when played back through Spotify. The track is streamed at around -14 LUFS which means the tracks overall volume is lowered, however the damage done by the excessive compression and limiting is irreversible.
This track will lack the charisma and energy of its more dynamic counterpart pictured in green at the beginning of the example.
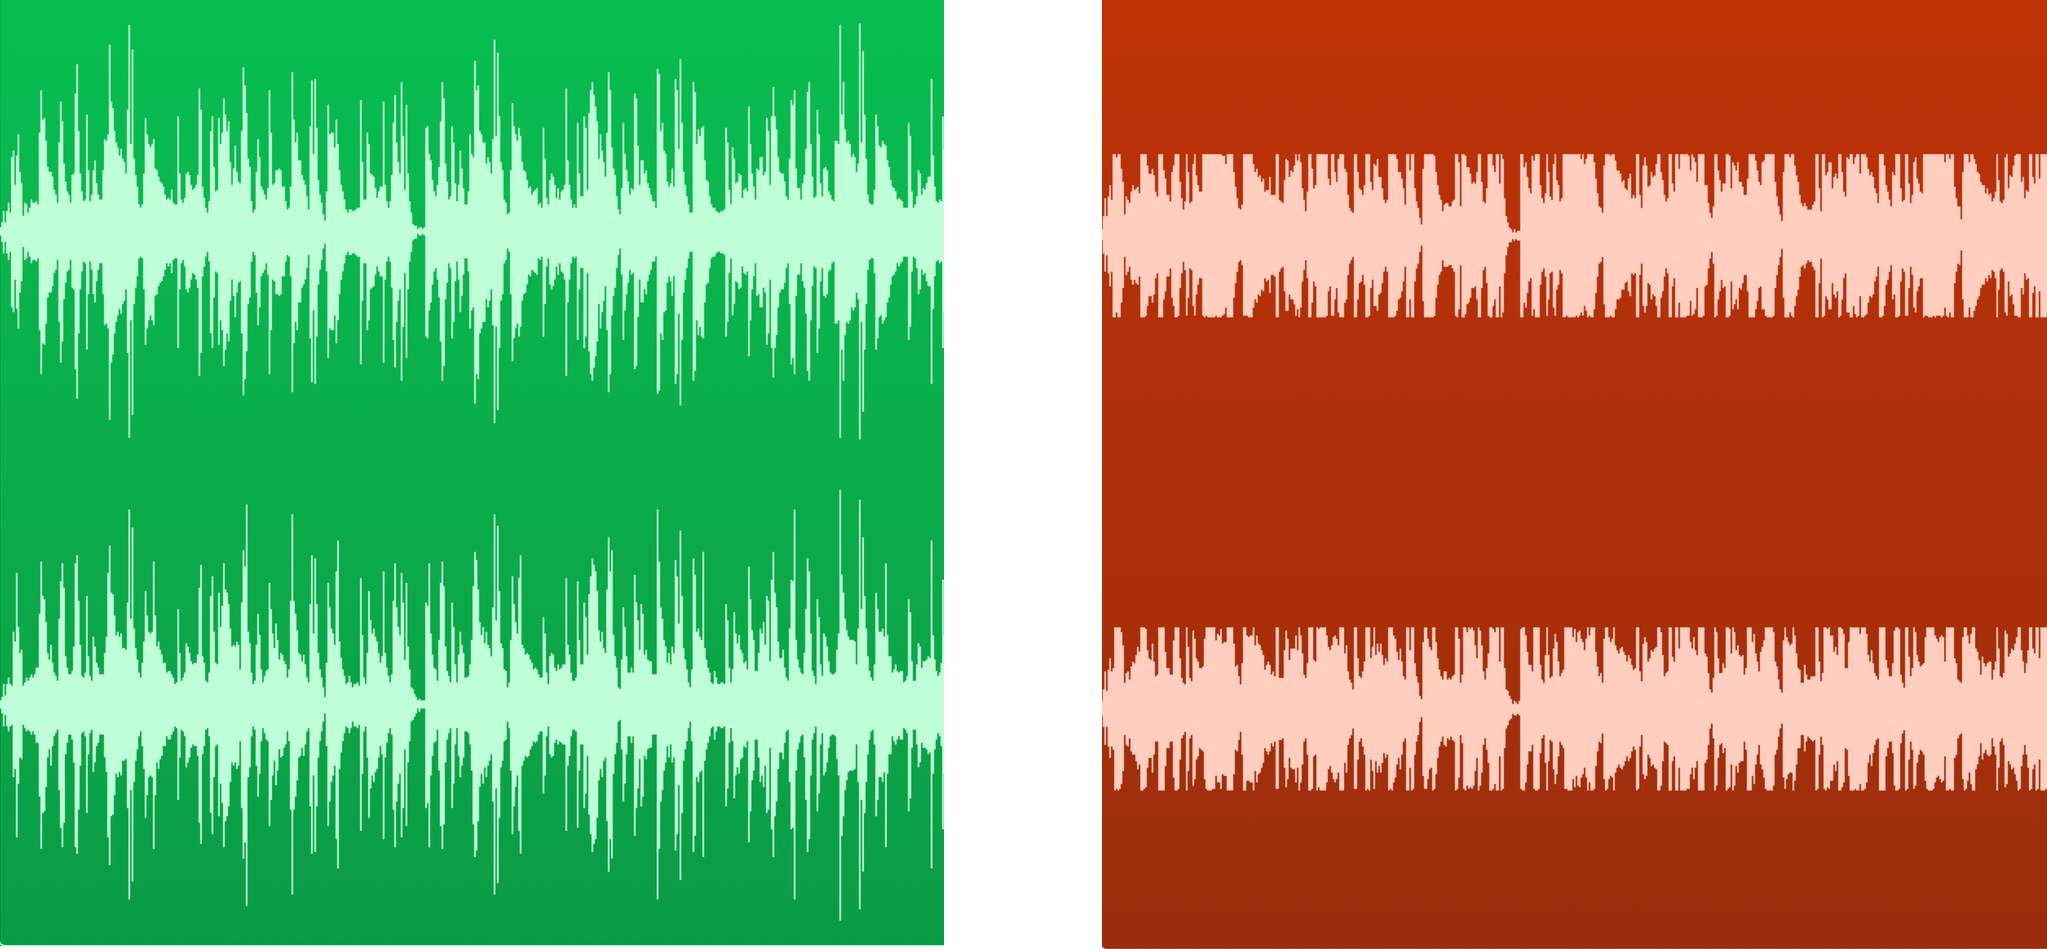
Here we see the same track used in the examples above pictured side by side. They both have a loudness reading of -14 LUFS. The more dynamic bounce (green) will sound a lot better when played back through online streaming services.
LOUDNESS TARGETS FOR STREAMING PLATFORMS CHART
Platform |
Peak |
Loudness |
Dynamic Range |
|
Spotify |
-1.0 dBTP |
-13 to -15 LUFS |
>9DR |
|
Apple Music |
-1.0 dBTP
|
-16 LUFS
(±1.0 LU) |
>9DR
|
|
Apple Podcasts |
-1.0 dBTP
|
-16 LUFS
(±1.0 LU) |
>9DR
|
| Amazon Music | -2.0dBTP |
-9 to -13 LUFS |
>9DR |
| Spotify Loud |
-2.0 dBTP
|
-11 LUFS | >9DR |
|
Youtube |
-1.0 dBTP
|
-13 to -15 LUFS
|
>9DR
|
|
Deezer |
-1.0 dBTP | -14 to -16 LUFS |
>9DR
|
|
CD |
-0.1 dBTP
|
> -9 LUFS
|
>9DR
|
|
Club Play |
-0.1 dBTP
|
-6 to -9 LUFS
|
>8DR
|
|
Soundcloud |
-1.0 dBTP
|
-8 to -13 LUFS
|
>9DR
|
Table Updated Dec 2020
SO HOW LOUD SHOULD I MASTER MY MUSIC?
You should master your music so it sounds great to you! These figures aren’t ‘targets’, but it’s worth remembering that:
1. Louder music can appear to sound ‘better’, so be sure to level-match your master when referencing your favorite mixes in the studio (we have an awesome plugin for that called REFERENCE, check it out!)
2. Your music will get turned down if it’s louder than -14 LUFS. Going for a more dynamic and punchy mix will sound better than an over-compressed, distorted master. I personally like to keep my clients music no louder than around -8 short-term LUFS during the loudest part of the song when I’m mastering for Spotify.
3. Spotify suggests leaving at least -1dBTP (decibels true peak) of headroom when submitting music so they are optimized for the lossy formats. They suggest -2dBTP of headroom for loud track, as loud tracks have a greater chance of clipping during transcoding. Spotify streams audio using Ogg Vorbis and AAC files which are almost guaranteed to increase the peak levels.
4. Don’t master too quiet! Amazon music turns louder songs down, but doesn’t currently turn the quiet tracks up. You wouldn’t want your song to lack energy compared to the other tracks, so try to keep the overall integrated LUFS value at -16 LUFS or louder.
What Is The Best Volume To Use When Submitting Music To Soundcloud?
Soundcloud is different when it comes to loudness. Soundcloud doesn’t normalize the volume playback on their tracks. But it’s worth noting that they transcode all their audio to 128kbps MP3 for streaming. When the track is transcoded, some clipping and distortion can take place.
Louder tracks with higher peaks suffer the worst from the encoding and end up sounding crunchy and lacking clarity. Leave at least -1dBTP of headroom when mastering for Soundcloud and try not to go louder than -7 LUFS short-term.
Apples plugin ‘RoundtripAAC’ lets you preview how your track will sound in a lossy format. It will also tell you if your track will clip once it has been converted for streaming. RoundTripAAC converts to AAC rather than MP3 but it will give you a good reference.
CONCLUSION
There is no need to compress and limit your music to the max to ‘compete with other releases’. A dynamic and less squashed track will make your music stand out from the rest on online streaming platforms.
Master your audio to a loudness that you feel best serves the music, but be aware that high peak levels and super-loud masters will give your listeners a sub-standard listening experience when they stream your audio.